Tuesday, December 22, 2015

Gingerbread Cupcakes


Gingerbread Cupcakes

I love Christmas and it is the only time I can give myself an excuse to get fat. I love cakes, cupcakes and cookies. I can't wait to make this gingerbread cupcake from bakedbyrachel. These moist gingerbread cupcakes with brown sugar cinnamon cream cheese frosting are the best. Can't wait to share these cupcakes with the rest of my family and friends.

Ingredients:

Cupcakes:

  • 1/4C unsalted butter, softened (55gm)
  • 1/2C light brown sugar
  • 1 large egg
  • 1/2 tsp vanilla extract
  • 3/4 tsp cinnamon
  • 1/4 tsp all spice
  • 1/2 tsp ground ginger
  • Pinch of cloves
  • 1/4 tsp salt
  • 1/2 tsp baking soda
  • 3/4C all purpose flour
  • 1/4C sour cream or yogurt
  • 2Tb hot water

Frosting:

  • 171 grams cream cheese, softened
  • 1/4C unsalted butter, softened
  • 1/2 tsp vanilla extract
  • 1 tsp cinnamon
  • 1/4C brown sugar
  • 3C powdered sugar, sifted
  • Gingerbread cookies, for decoration

Directions:

  1. Preheat oven to 350°F. Line a cupcake pan with 7 paper liners. 
  2. In a large bowl or stand mixer, cream together butter and brown sugar. Mix in egg and vanilla, beating until smooth. Scrape bowl as needed. Add spices, salt and baking powder, mixing until just dispersed. With mixer on low, alternate additions of flour and yogurt, finishing with 2 tablespoons of hot water. Continue mixing until no streaks remain. 
  3. Divide batter between prepared paper liners, using a large cookie scoop.
  4. Bake for 18-20 minutes or until a toothpick inserted comes out clean. Cool in pan until easy to handle, then transfer to a wire rack to cool completely. 
  5. In a large bowl or stand mixer, beat together cream cheese and butter until smooth. Mix in vanilla, cinnamon and brown sugar until just combined. Add powdered sugar in small batches, mixing well between additions. Transfer frosting to a large piping bag fit with a piping tip. Pipe as desired. Alternately a gallon storage bag may be used with the corner snipped off. Decorate with a small gingerbread cookie.

Simple Carrot Cupcakes with Cream Cheese Frosting

I have been looking for a simple carrot cupcake recipe for my little Sebastian and I stumble into this recipe from pinchofyum. It is absolutely perfect, simple ingredients and easy to make.

Ingredients

For the cupcakes
  • 1 cup flour
  • ¾ cup sugar
  • 1 teaspoon cinnamon
  • 1 teaspoon baking soda
  • ½ teaspoon baking powder
  • ¼ teaspoon salt
  • 1½ cups grated carrots (heaping)
  • ⅔ cup oil
  • 2 eggs, beaten
For the frosting
  • 114 grams cream cheese
  • 57 grams butter
  • 2 cups powdered sugar
  • 1 teaspoon vanilla
Instructions
  1. Preheat the oven to 350 degrees. Combine the flour, sugar, cinnamon, baking soda, baking powder, and salt in a large bowl. In a separate bowl, combine the grated carrots and the oil. Slowly add the flour mixture, stirring until just mixed. Add the beaten eggs and stir a few times (like 15 or less around the bowl - the fewer the better)!
  2. Grease a muffin tin or use paper liners. Scoop the batter into a muffin tin, filling each muffin tin about ⅔ of the way up the side. Bake for 13 minutes, check how they're doing, and add a few minutes if necessary. I find that the baking time varies greatly with oven, so just check for the right golden brown colour and springy tops. Allow the cupcakes to cool.
  3. For the frosting, blend the cream cheese, butter, and vanilla until smooth. Slowly beat in the powdered sugar until smooth. Transfer to a plastic bag or similar tool for piping the frosting evenly on the cupcakes.


Sunday, December 20, 2015

Woofie Christmas cookies - peanut butter dog treats recipe


I was thinking what would make my dog, #Mallowcheng, happier this Christmas. Then this great idea came to my mind. I am going to make her some Christmas cookies. I found this recipe in Pinterest and it is great. I didn't try it myself but Mallow loves it. My son, Sebastian, loves to feed Mallow so I was thinking this recipe is good and I don't mind him eating it too.

Ingredients:

1 cup peanut butter
1 cup rolled oats (optional, when you want to add extra texture to your biscuit)
1 cup milk
2 cups flour
2 tablespoon baking powder


Instructions


Preheat your oven to 375 degrees Fahrenheit while preparing the ingredients. Mix all the dry ingredients in a bowl and then add the milk. Mix the peanut butter last. Mix these ingredients until you get the consistency of bread dough which you could later on flatten and create different shapes out of it.Once ready, put your dough cuts in a baking pan and let it cook in the oven for about 18 minutes or until it is golden brown.

Thursday, December 17, 2015

Decorative scented ornament with coffee salt dough


I just love making these ornaments. I use it as an air freshener by adding a few drop of essential oils to the flower. It makes my home smells so good. I even put one of this ornament in my toilet. I mix lavender oil and mint oil to it. I smells so refreshing! I guess the coffee ground in the salt dough plays an important role to neutralise the bad odour in the toilet as well.


Coffee Salt dough recipe:

1 cup of used coffee grounds

1cup of salt

1cup of flour

1 cup of water (You don’t need the full cup)


Salt dough recipe:

1cup of salt

2 cups of flour

1 cup of water

A few drops of food colouring
(I used red and blue colouring and I mixed the blue and red to make the purple)


Instructions

Mix both recipes separately using different bowls. Then, slowly add the water to the dry mixture and knead the mixture into dough. If it is too sticky add more flour.

Once you are happy with your project, bake it for 1 to 2 hours at about 100’c.

Once the ornament cools down to room temperature, add about 20 drops of the lavender essential oil to the ornament. I top it with some coffee beans just for decoration.

To make the leaves, I used these cutters. 
To make the butterfly, I used these cutters. 
 
To make the flower, I used these cutters. 


Gingerbread cookies for Christmas

Christmas is always a good excuse for me to stuff a few more cookies into my mouth. I just love the smell of cinnamon, ginger and cloves that fills my home when I bake these cookies. They are so delicious and even my little Sebastian loves it!

This Gingerbread cookie recipe is adapted from my favourite chef's recipe, Donna Hay.
  • 125g unsalted butter, softened
  • ½ cup (90g) brown sugar
  • ⅔ cup (230g) golden syrup (I use molasses)
  • 2½ cups (375g) plain (all-purpose) flour, sifted
  • 2 teaspoons ground ginger (I switched it with 1 teaspoon of cinnamon, 1 teaspoon of ginger and 1 teaspoon of cloves)
  • 1 teaspoon bicarbonate of (baking) soda


Monday, November 16, 2015

Decorative Jewellery holder from Salt dough

I really enjoy working with salt dough and moulding it into something beautiful. This time I made a decorative jewellery holder and I love it!  


Coffee Salt dough recipe:

1 cup of used coffee grounds

1cup of salt

1cup of flour

1 cup of water (You don’t need the full cup)


Salt dough recipe:

1cup of salt

2 cups of flour

1 cup of water

A few drops of food colouring


Instructions

Mix both recipes separately using different bowls. Then, slowly add the water to the dry mixture and knead the mixture into dough. If it is too sticky add more flour.

Once you are happy with your project, bake it for 1 to 2 hours at about 100’c.

Once the ornament cools down to room temperature, add about 20 drops of the lavender essential oil to the ornament. I top it with some coffee beans just for decoration.

To make the leaves, I used these cutters. 
To make the butterfly, I used these cutters. 
 
To make the flower, I used these cutters. 
 

Thursday, November 12, 2015

Decorative air freshener from salt dough


I really enjoy working with salt dough and moulding it into something beautiful. I bought some new cutters from eBay recently and I thought of trying something different. I wanted to make a decorative ornaments that I can place it anywhere in my house and it can permeates the fragrant smell of the essential oil that resides in it.


Coffee Salt dough recipe:

1 cup of used coffee grounds

1cup of salt

1cup of flour

1 cup of water (You don’t need the full cup)


Salt dough recipe:

1cup of salt

2 cups of flour

1 cup of water

A few drops of food colouring


Instructions

Mix both recipes separately using different bowls. Then, slowly add the water to the dry mixture and knead the mixture into dough. If it is too sticky add more flour.

Once you are happy with your project, bake it for 1 to 2 hours at about 100’c.

Once the ornament cools down to room temperature, add about 20 drops of the lavender essential oil to the ornament. I top it with some coffee beans just for decoration.

To make the leaves, I used these cutter.


To make the butterfly, I used these cutters
 

To make the flower, I used these cutters 

Thursday, October 29, 2015

Coffee Salt dough mini potplant


Salt dough is amazing and it only requires staple ingredients which are easily found in any household pantry. I started using it to make alphabet blocks for my son to learn alphabets. Then I started to be more creative and I made a fridge magnet for Father’s day. I just fell in love with it and it is addictive! I recently found this coffee salt dough recipe which uses used coffee grounds as part of the ingredient.  I love the idea of using recycled stuff and turn it into something useful.  

Coffee Salt dough recipe:

1 cup of used coffee grounds
1cup of salt
1cup of flour
1 cup of water (You don’t need the full cup)

 Instructions

Mix the coffee grounds, salt, flour into a mixing bowl. Then, slowly add the water to the dry mixture and knead the mixture into dough. If it is too sticky add more flour.
Once you are happy with your project, bake it for 1 to 2 hours at about 100’c.
 
To make the flowers, I used these cutters


To make the house, I used this cutter
For the house impression, I used this cutter  

Wednesday, September 9, 2015

Let's get cooking - 2 ingredients pizza dough in less than 15 minutes

  
Sometimes being a working mum is not easy especially when you prepared all the food in to morning before you go to work for dinner and your precious little one just refused to eat his dinner. =(
This is quite frustrating! But he still needs to have his dinner.
I am so glad that I found this 2 ingredients pizza dough recipe which is just great and I can get a quick dinner in half and hour. Just 15 minutes to prepare and 15 minutes in the oven.

What do I need?
1 cup of Greek yogurt
1 cup of self raising flour
(Tips: If you don’t have self raising flour, then you can make your own version by adding 1 teaspoon of baking powder to 1 cup of plain flour. You could also substitute natural yogurt instead of Greek yogurt if you prefer.)


What do I need to do?
 
1. Put all the ingredients into the food processor
2. Press the start button
3.Remove the dough from the food processor
4.Spread some flour on the kitchen counter and knead it
5. Knead it and add more flour if necessary  until it looks like the picture. The more love you put into your dough, the tastier it will be.
6.Flatten the dough and start adding your favourite pizza mix.
7.Put it in the oven and baked it at 160'c for 15 minutes depending on the size of the pizza.
Optional- I made some bacon,cheese and vegemite scrolls too. They are yummy!


Thursday, August 27, 2015

Essential Oils and Weight Loss


Even though aromatherapy has been employed therapeutically for thousands of years across the globe, scientific research on the veracity of essential oils is still in its infancy. However, essential oil aromatherapy can be an effective treatment for anxiety and hormone imbalance. I can testify this statement as it works for me. I am a working mum and I get stressed out easily from work, family and house chores. There are just so much to do with so little time. Therefore, when I reached home from work I will immediately lit up some candles and let the essential oil perfumes my house to relax my nerves before I start to attack anyone.

While there’s no substitute for diet and exercise, many of the hurdles to losing weight (and keeping it off) have a psychophysiological basis. Whether you struggle with emotional eating, dieting fatigue, lack of consistent motivation, slow metabolism, cravings for sweet foods, low energy, poor digestion, or depressed moods, using essential oils as part of your fitness program could be the missing piece that helps propel and sustain you in your weight loss goals.

Some articles mentioned to use it as internal consumption. But, I personally will not recommend this.

Essential oils and the benefits 
Grapefruit Essential Oil
Curbs cravings, Boosts metabolism, Increases energy and endurance, Reduces abdominal fat accumulation
Lemon Essential Oil
Suppresses weight gain, Increases energy, Enhances mood, Relieves pain
Peppermint Essential Oil
Increases energy and mental alertness, Elevates mood Aids digestion, Reduces appetite
Cinnamon Essential Oil
Improve insulin sensitivity, Regulate blood sugar levels, Reduce inflammation
Bergamot Essential Oil
Boosts mood and Increases energy
Fennel Essential Oil
Improves digestion, Suppresses appetite, reduces weight gain, More restful sleep

Essential Oil Blends For Weight LossI found some great recipes online that I can't wait to start trying it out.


Massage oil blends

Fat Reducing Massage – Mix together a quarter cup of almond oil with five drops each of grapefruit, lemon, and cypress oil.


Anti-Cellulite Rub – Combine 10 drops of grapefruit, five drops of rosemary, and two drops each of cypress, peppermint, and ginger oils. Blend with a carrier oil before applying to the body.


Craving Curbing Salve – Mix a half cup of olive oil with 80 drops of fennel, 40 drops of bergamot, and 24 drops of patchouli oil and massage on the abdomen.


Bath  blends
Use only 5-8 drops total of essential oil in a carrier per bath. It is best not to pour the essential oils directly into the bath water. Dilute them first in an ounce of bath salts, ½ ounce of any carrier oil, or in one cup of whole milk or heavy/light cream.


Cellulite Reducing and Weight Loss Boosting Bath Blend - Add 2 drops each of grapefruit, ginger, orange, sandalwood essential oils to 1 cup raw apple cider vinegar and add to a warm bath. Do not add the essential oils to running water to avoid evaporation and mix in by hand. Soak for 20 to 30 minutes.

Metabolism Boosting Soak ­– Draw a bath and add two tablespoons of jojoba oil, 3 drops of rosemary, 3 drops of cypress, and 2 drops of grapefruit oil.


Diffuser blends
Appetite Suppressing Diffusion – Blend together 40 drops of mandarin, 20 drops of lemon, 12 drops of ginger, and 12 drops of peppermint and add a few drops of the blend to your diffuser.


Dilution general guide:


1% dilution = 5-6 drops of essential oil to each ounce of carrier oil or cream. This dilution is used for children, elders, chronically ill persons, and pregnant women.
2% dilution = 10-12 drops of essential oils to each ounce of carrier oil or cream. This dilution is used for massage oils for the average adult.
3% dilution= 15-18 drops of essential oil to each ounce of carrier oil or cream. This dilution is used for specific illnesses or for acute injury.

Information from here.


More information about essential oils and weight loss:
https://www.stillpointaromatics.com/application-dilution-of-essential-oils

http://www.naturallivingideas.com/the-complete-guide-to-using-essential-oils-for-weight-loss/
http://www.grassfedgirl.com/6-essential-oils-for-weight-loss/
http://www.sustainablebabysteps.com/lemon-essential-oil.html
http://www.healthyandnaturalworld.com/best-essential-oils-for-weight-loss/

Wednesday, August 26, 2015

Father's day DIY gift idea - Salt dough fridge magnet


I love salt dough. It is so versatile and it only requires a few ingredients that I can find in my pantry. It can be turn into almost anything. I love to use the salt dough instead of the white dough  because it is all natural and this will ease my mind if my Sebastian ever put his fingers in his mouth when we are playing with it. (If I am working alone I might consider using white dough as they are nicer and smoother) But, my Sebastian always comes first over everything else. Previously, we made some alphabets with salt dough and I thought is a really great activity for him to learn alphabets and now he can recognised most of the alphabets. (I am super proud of him!) I also made some edible paint for him to paint his alphabets and the handprints plaque. (We had so much fun!)

Anyway, Father's day is just around the corner and my mother has requested me to help her to make some gifts for her church members to celebrate Father's day. I thought a fridge magnet will be a good idea.


Ingredients
1 cup of salt
(This time I actually grinded my salt with my food processor before I used it. I find that the result is better)
2 cups of flour
1 cup of water
edible colouring of your choice
(Mix the colouring with the water before combining it with other ingredients)
1/4 tsp of lavender oil
(Be careful when using essential oil for toddlers.)
Instructions
Since I have used the food processor to grind my salt. I just mix the rest of the ingredients in and 'whizzed' it away until the salt dough is well combined. I put a layer of cling wrap on my kitchen bench top just in case the colour might stained the it. Then I transferred the dough onto the work bench and using my rolling pin to roll it into a thin sheet. Then, let your imagination run wild!
Put it in the oven for 100 'c (212 'f ) for 3 hours. Turn it over after 1.5 hours. (My mum accidentally put it to 180'c and I only realised it after 1.5 hours when I was about to turn it to the other side. Therefore, when you look at my design, it looks burnt. Well, ,my mum called it the rustic look)
I bought a roll of magnetic strip from the $2 dollar shop. (Well, it actually cost me $3. ) I glued it to the back of my design and that's it! Simple and Easy.

Monday, August 24, 2015

Beauty tips: Double cleansing using 4-2-4 method (with DIY oil cleansing recipe)

Aging and wrinkles are every woman's nightmares. My mum always says 'There are no ugly women in this world, only lazy ones'. I guess she is right, it is time for me to take my fate in to my own hands and start putting some efforts on my aging skin.
I am very eager to try this double cleansing with 4-2-4 method which originates from Korea.(But some said Japan) I read a lot of pros and cons about this method and had decided to give this method a go.
Basically the process follows a simple formula: Cleanse first with a cleansing oil to dissolve the makeup for 4 minutes. Then follow up with a soapier cleanser for 2 minutes. This helps to remove leftover impurities and cleanses deeper into the pores. The last step involves using warm and cool water to rinse the face. Use warm water during the first two minutes of the rinsing process. This will help increase blood circulation as well as effectively remove the dirt that was picked up by the cleansing foam. In the last two minutes, use cold water to help close the pores. it will also give you that fresh and revitalizing feeling. It’s such a great treat to give to tired skin.
After cleansing your face, you can then proceed to your usual night time routine. In my case my night time skin care routine consists of the following steps: toner-serum-emulsion/moisturizer/eye cream/lip balm.
Well, I love the idea of making my own product and the ingredients to make the cleansing oil is not hard at all. The basic ingredients are part castor oil, part carrier oil and some essential oil boosters. Castor oil is the cleansing agent and it breaks and dissolves the impurities on our skin. Then, the carrier oil replaces the moisture that the castor oil removed. Finally, the essential oil  infuse our skin with concentrated complexion-loving ingredients. You can find your perfect oil and essential oil combination here.

My cleansing oil recipe (for combination skin)
Ingredients
 -1 clean bottle
- 1 tbsp. Castor oil
- 1 tbsp. Rosehip oil (I love Rosehip oil)
- 1 tbsp. Almond oil
- 10 drops of lemon essential oil for whitening effect

Instructions
Add each oil to the 4 bottle using a small funnel if needed.Next add in the essential oils. Cap tightly and ROLL the mixture between your hands to mix. (I made a small batch to try it out. )

To Wash Face With the cleansing Oil
Put a quarter sized amount of oil in the palm and gently apply it to the whole face and neck. With the 4-2-4 method, slowly massage the oil over the skin in a circular motion for about 4 minutes.  Apply it on a dry face and do not rinse with water. Next take a warm damp cloth and gently wipe off the oil.


Tips: This deep cleansing method should be done regularly, but not too frequently. You'll know if you're deep cleansing too frequently by the dryness that your skin will exhibit.


More information about;
-Double cleansing
http://www.vogue.com/13257184/double-cleansing-japanese-skin-care-acne/
http://sokoglam.com/blogs/news/15008477-tutorial-the-double-cleanse
http://shesintheglow.com/double-cleansing/
-Oil cleaning method
http://theoilcleansingmethod.com/
http://beautyeditor.ca/2010/11/15/my-brief-traumatic-foray-into-the-oil-cleansing-method-or-how-overreaching-can-sometimes-backfire-on-your-skin
http://www.crunchybetty.com/trying-and-troubleshooting-the-oil-cleansing-method-tips-for-flawless-oil-cleansed-skin
http://wellnessmama.com/7569/skin-oil-cleansing/
http://www.buzzfeed.com/alisoncaporimo/oil-cleansing#.xyEB4qj9VJ
http://www.makeupalley.com/product/showreview.asp/ItemId=73176/Oil-Cleansing-Method-(OCM)/No-Brand-(DIY-or-homemade)/Cleansers
-Essential oils
http://www.crunchybetty.com/21-things-you-should-know-about-essential-oils
http://www.holistichealthherbalist.com/enhanced-oil-cleansing-method/
DAY 1
I made a small batch of cleansing oil and I used it with the 4-2-4 method. (I applied the cleansing oil on my face without rinsing my face first) Then, I used my coffee scrub follow by my Turmeric Mask. After I cleaned my mask, I applied my favourite Rosehip oil. This morning I found a pimple on my nose. =(
I honestly felt good after I used the cleansing oil. But I found a pimple on my face this morning.
DAY 2


Except for the blemish on the tip of my nose, everything seems fine. Not sure whether I am imagining things but I felt that the lemon essential oil is working its magic on my face. I felt that my face complexion looks better. Normally I am lazy to put a layer of sunblock on m face. But, today I took an extra effort to apply it on because I read an article yesterday to avoid sunlight for 12 hours after use.


DAY 3
I usually use my La Mer cleansing oil to remove my makeup but I thought of giving my DIY cleansing oil a try. I find that my DIY cleansing oil works really well. I used it with the 4-2-4 methods so I massaged the oil on my face for 4 minutes in circular motion and later I cleaned it with a hot towel. My face felt clean and refresh. I love it! (I prefer my DIY cleansing oil to my La Mer's cleansing oil as La Mer's cleansing oil stinks my eyes every time I used it to remove my make up)
DAY 5
On Day 2, I mentioned that I felt my skin is fairer. Today I did a comparison for the last 5 days and my skin really looks brighter and fairer! I think the essential oil is working =D I noticed that the red spots around my cheeks on Day 1 are much lighter in Day 5 too.


Wednesday, August 19, 2015

DIY Homemade Natural Hair Gel


My mum has been complaining about me losing too much hair. She said if I don't take care of my hair now, I will be bald when I am her age. I frantically look for hair growth tips and I read some articles that said aloe vera and lavender oil are good for promoting hair growth. Then I thought why not make a hair gel with these two ingredients. I can 'kill two birds with one stone' - I can style and nourished it at the same time. Also, unlike commercial hair gel that contains a lot of weird ingredients, this recipe only calls for 4 and they are all natural.

Ingredients
¼ teaspoon unflavoured gelatine

½ cup hot distilled or filtered water (I used tap water)
1 tablespoon aloe vera gel

4-6 drops essential oils 


Directions:
Heat the water and mix in the gelatine in a small saucepan. Stir well to combine.
Once the liquid is cool and before it is set, add in the essential oils and aloe vera gel.
Stir the mixture and pour the mixture into a glass jar.  
Store the container in the refrigerator for at least 3 hours or until the gelatine set.
Keep styling gel refrigerated between uses.
Gel will keep for about 2 weeks in the refrigerator.


(Some gelatine is made from animal parts. Therefore, I have a recipe especially for Vegan) 
Ingredients:
1/2 teaspoon agar-agar flakes
1/2 cup hot water
1 tablespoon aloe vera gel
 4-6 drops essential oils 


Directions:
Heat the water and mix in the agar-agar flakes in a small saucepan. Stir well to combine.
Once the liquid is cool and before it is set, add in the essential oils and aloe vera gel.
Stir the mixture and pour the mixture into a glass jar.  
Store the container in the refrigerator for at least 3 hours or until the gelatine set.
Keep styling gel refrigerated between uses.
Gel will keep for about 2 weeks in the refrigerator.

Essential oils for hair care
Lime essential oil smells amazing, and is helpful for balancing oily hair. In a more concentrated form it may also lighten hair.

Peppermint and rosemary essential oils stimulate hair growth and add shine. Great for normal hair.

Basil, thyme, patchouli, tea tree and lemongrass have astringent properties which are beneficial for oily hair
Chamomile, lavender, sandalwood and rosemary are helpful for dry hair.

Clary sage, tea tree, eucalyptus, and patchouli are helpful for dandruff

Monday, August 17, 2015

Sensory play activity with dry pasta - Hide and Seek with animals

He loves playing with the dry pasta. Maybe it is because he is only allowed to play with it when I am around. Small things like pasta can be a chocking hazard so I prefer to supervise him while he is playing with it. 


For this activity, I hid the plastic animals in the pasta and I asked him to find the animal. I will name the animal and make the animal's sound. When he found it, he will repeat the animal's name and sound. I am a believer in praise, encouragement and rewards for kids. I always praise him when he do well.  I always felt a little encouragements wont hurt.
 

Sunday, August 16, 2015

Homemade edible Finger paint

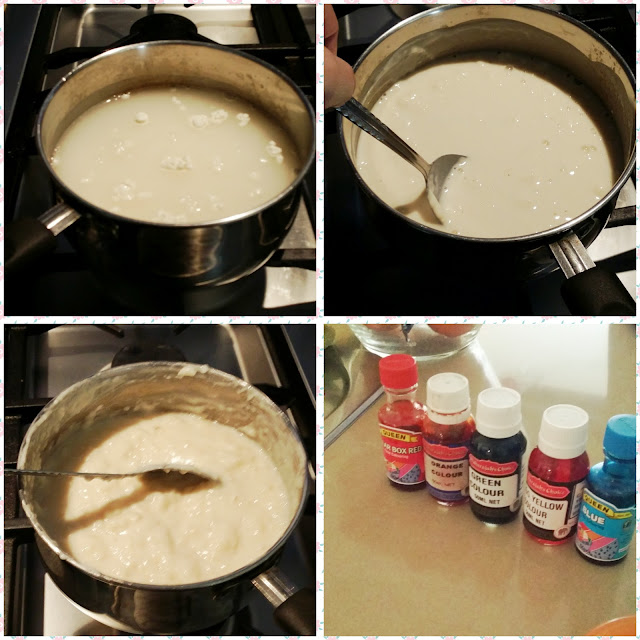
I made some salt dough alphabets and handprints plaque last week and was so excited to make the paint so that I can paint it with my little Sebastian. This is my first time making edible paint and it turns out not too bad. Just a little bit lumpy. I should have used my food processor to mix all the ingredients before cooking it on the stove. But overall, it is a pretty good experience and I will definitely make it again with my little Sebastian.

Ingredients:
1 cup of Flour
4 tablespoons of sugar
2 cups of cold water
Pinch of Salt
Food colouring


Instructions:
Mix all of the ingredients together in a food processor except the colouring. (Make sure the mixture is smooth and not lumpy) Then transfer the mixture to the stove and heat in on a medium low fire. Stir it constantly until the mixture thicken. Once it has thickened turn the burner off and let it cool. After cooling divide the finger paint into separate storage containers and add food coloring. Make sure the lids are on tight while storing so it doesn’t dry out.